


October 9, 2023
Rack Attack Team
When winter arrives and the call of the slopes beckons, you know it's time to prepare for your next skiing adventure. Central to this preparation is ensuring your skis are safely and securely attached to your roof rack. Whether you have a Thule, Yakima, Kuat, or any other original manufacturer rack system, we've got you covered. This guide will show you how to safely and confidently put your skis on your car.
Gathering Your Tools and Materials
Before embarking on this skiing journey, ensure you have all the necessary tools and materials at your disposal:
- Your prized skis or snowboards ready for the slopes.
- Your trusty roof rack system (whether it's Thule, Yakima, Kuat, or another brand).
- Ski Rack or Cargo Box depending on your preferred method (more on this below!)
- The helping hand of a friend or family member makes the process even smoother and safer.
Preparing Your Roof Rack System
You must ensure that you correctly install and prepare your roof rack for your ski rack as a crucial first step. To install your roof rack system, read and follow the manufacturer's instructions provided. Alternatively, you can visit Rack Attack, where our Gear Guides are available to assist you with the installation process.
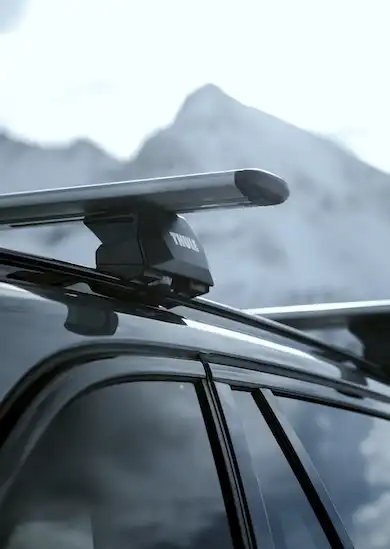
We always recommend you consult your vehicle's manual owner to confirm the weight capacity of your roof prior to loading anything. Use our Rack Wizard tool to find the best roof rack for your specific vehicle. The Thule Wingbar Evo is our top staff choice because of its easy installation and integrated end caps.
Choose Between a Ski Rack Carrier or Cargo Box
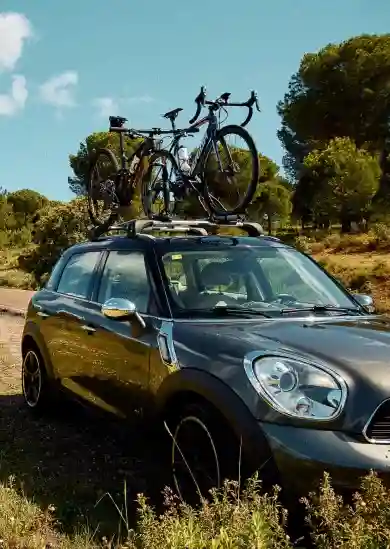
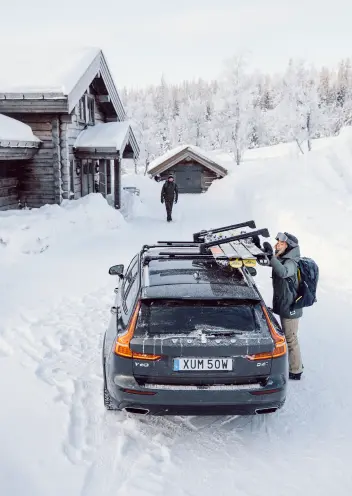
Method 1: Ski or Snowboard Rack Carrier
This method is great if you're tight on storage space, but remember that your skis/gear will be exposed to the weather or road debris. Ski/snowboard carriers are added to your roof rack system and carry anywhere from 8 pairs of skis or 4 snowboards. If carrying more than 6 sets, we recommend a Yakima or Kuat option as they feature wider loading platforms compared to Thule. A ski rack option is typically cheaper than a cargo box too.
SHOP ALL SKI & SNOWBOARD RACKS
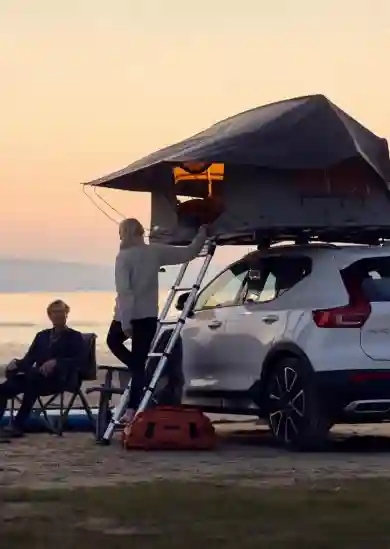
Method 2: Cargo Box
This method provides a little more protection for your gear with the added benefit of closing and locking your gear inside. It also provides the opportunity to carry other items like snow boots or wet gear instead of packing everything inside your vehicle. The cargo box is also great for summer camping trips, transporting strollers, or golf clubs, so it works well year-round.
The key call-out for the cargo box is to measure your skis and the box length before purchasing to make sure they will fit! Every box has a listed max ski size or check the our product pages to find the correct information.
Secure your Skis/Snowboards
Method 1: Ski or Snowboard Rack Carrier
- Open the ski rack's clamps or arms to create space for your skis.
- Gently place your skis into the designated slots. Ensure the tail ends face forward so the wind doesn't catch the front tips the whole way. If loading more than one set of skis or snowboards, position them 1" apart across the rack.
- Certain extension models can ease the loading process for taller vehicles. Check out the Kuat Grip or Thule Snowpack Extender to find out more.
- Close and secure the clamps or arms over your skis, ensuring a snug fit. Make sure you close them all the way to prevent any trouble with locking the unit when it's fully loaded. The tops and bottoms of the ski carrier should remain parallel when in use/transport.
- Lock them with the supplied key. Make sure to store the key in a safe spot!
- Pro tip: bring an old towel to clear your equipment before riding and prior to home storage. Road debris will dirty your gear.
Method 2: Cargo Box
- Load your gear inside your cargo box.
- You should always secure your car box gear with tie-down points. This will prevent gear from moving around during transit, and prevent damaging your gear, or your box. Free-standing items can slide front to back and could damage or break the lid lifter.
- Most boxes feature tie-down points internally for leashing or strapping products whether skis/boards or other gear.
- We encourage customers to use an old yoga mat, instead of towels/blankets as they can be heavy and become clunky or do the opposite of what you intend.
- For both methods, if you have trouble reaching the top of your vehicle to load/unload your gear, we recommend looking into a wheel step or hitch step. Check out the moki step as a great alternative.
- Shut and lock the box.
Double-Checking Your Setup
Before you go, make sure to do a complete check to ensure your ski setup is safe and stable. Confirm that you have firmly attached your skis, and they won't shift during transit. Double-check that you securely fasten all straps, clamps, or ski rack arms. Ensure your skis don't stick out wider than your vehicle to avoid road dangers.
Safe and Stress-Free Ski Adventures Await
Now that you know how to put your skis/snowboards safely on your vehicle, you're ready for your winter adventures. Feel free to reach out to Rack Attack anytime to learn more about different options to carry your gear.
For ski racks, our top recommendation is the Kuat Grip as the best available on the market. Followed by the Yakima Fat Cat 6 or the Thule Snowpack 6.
For cargo boxes, it all depends on the vehicle, but the Motion XT series from Thule is a great and reliable option. The Thule Motion XT XL Special Edition is exclusively available at Rack Attack with a unique interior color. Rack Attack is here to support your winter adventures, helping you make the most of your skiing experiences. Stay safe, and have fun skiing!